The magic of mark resist.
Mark resist is a polyester film with a texture on at least one side. This can be used to hold a mark from a pencil, crayon, wash, splatter or even scratches. It was introduced 40 years ago as an addition to methods of creating masks for a silk screen to enable tonal images to be printed through the mesh.
In the past screen printers have used a wide range of materials to create masks including paper, paint, ‘stop out’ which traditionally created swathes of flat colour suitable for posters. Film negatives were invented to enable bit mapped and half tone dot images to create photographic style images that could be held on the screen by exposing through a light sensitive emulsion to create a photostencil to be printed as the ink passed through the mesh. This enabled large scale photographic images to be created for bill boards and the like. CMYK being used to split an image into 4 colours then printed in register to recreate the colour photograph.
I studied Print between 1973 and 79 at Newcastle polytechnic and the Royal College of Art where I concentrated on lithography and etching. So when I ventured into a 21st C print room in Birmingham City University’s Parkside in 2015 I was entranced by the large scale litho like marks on an A1 sheet of paper pinned to the wall. 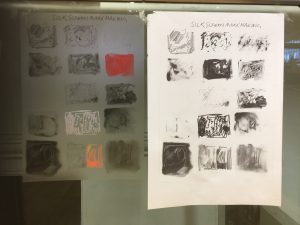 When I asked how was the litho produced at such scale, Master Printmaker Justin Sanders replied : “Its not a litho, its silkscreen” – but how? I enquired
That was the beginning of a printmaking journey: the magic of mark resist. An opportunity to test mark making and exposure balances to achieve A1 tonal prints by following the printmaking mantra: “if you are not testing you are guessing”
I found that Mark Resist is the poor person’s True Grain! True grain was introduced in the 1993 by Autoype Ltd in Oxford and Curwen Chilford Studios, Cambridge as a new method of creating tonal silk screen stencils akin to Lithography. Another technological development that would take me on a further print journey – large scale AO ‘litho like’ silk screen prints.
True-Grain was launched following collaboration between Autotype and Curwen who had for some time been experimenting with the reproduction of fine tonal information through the medium of screen printing. The hand drawn artwork was exposed on to Autotype Alpha Star indirect photo-stencil film and printed by Curwen Chilford. From the same artwork Curwen also printed a litho version, holding the same tonal range, to confirm the benefits of True-Grain for both screen and litho reproduction.
“True-Grain guarantees that fine, medium or heavy tones reproduce with great clarify. The artist and the printer know that the image will be printed with no loss of definition. This advance is not to be underestimated. Generations of screen printers have been schooled to make all artwork opaque – now levels of transparency are the key in stencil making. In creative terms, this means that the process now has few, if any, limitations.”
Kip Gresham, Curwen Chilford Prints.
“True-Grain presents opportunities of subtlety that were previously difficult, if not impossible to obtain. As the work progressed it became clear that we were looking into the future of screen printing. The language of printmaking now has a new vocabulary, one which parallels lithography but has a distinct feeling of its own. A complete reappraisal will be necessary. As I worked new possibilities presented themselves. The tonal variety and quality of some of the marks were a revelation. This is the most easy and seductive surface on which to work.
Roy Watson, Artist.
Kip Gresham recently described his motivation to develop True Grain.
My aim was to make a transparent drafting material that paralleled the surface of a litho stone. The thing about the lithographic surfaces is that they put an organic or a natural half tone into a mark. With a chalk / crayon / graphite mark it has attack and decay; that is the mark has a beginning a middle and an end. It’s got tonal variation with pressure.
A wash made on a stone or plate drops into the minute indentations and has a fine granular structure which carries the tonality of the wash. I started by shot-blasting clear polyester or putting clear polyester into a litho plate graining machine. I also sanded the surface by hand. All of these surfaces worked, some better than others. I made prints this way and the results were amazing, totally unlike screen prints.
The experiments got more scientific, the research more precise and I began to manage the issue of ‘gamma’ which is the light transmission properties of a transparent material. The shot blasting / sanding etc gave great qualities to the drawing but the gamma was high, that is the material itself was blocking out a lot of the UV light passing through it for the stencil making.
After working with the Autotype labs in the 1990’s we modified a polyester using PVA coating and out of this came Truegrain. It has a flat PVA on one side and a cultured one on the other. The magic thing is that the gamma is very low. In fact if you print a flat varnish over the textured surface, it become like glass and the gamma is almost zero. Also. If you have a mezzotint screen (80% negative…so almost black) you can give a secondary exposure to a true grain stencil and it will have an extra depth of tone. This really works on photopolymer etching plates like KM73.
Try the sanding of clear polyester. It’s really interesting.
May 2020.
True Grain is available from John Purcell.
Dave Fortune describes how he introduced Mark Resist to fine art silk screen printing.
“Before I found Mark Resist we used hand drawn or photo stencils at the then Bristol Polytechnic. In particular we used a drawing film called Seritrace Drafting Film which was smooth and very stable but no grain to it, so only clean line work was really possible .
A visiting Erasmus student, who had designed and was producing an edition of images in the screenprinting area in 1989, had been given some textured film to use while working in a studio in France. It seemed to be just the right material needed for sensitive washes and produced a much more extensive range of marks. After some research and a few calls to France, I discovered that the textured film was called ‘Tru Grain’. I contacted the company that marketed this wonderful drawing film but found, to my horror, that not many students would be able to afford it. I originally contacted a company called ‘Cadillac Plastics’ who sent me the original samples. It was already called ‘Mark Resist 150 microns’. Thinking back, Marler-Gibbon supplied screen inks and equipment and I asked them to stock Mark Resist 150.
This film was originally designed for a totally different application but works perfectly and is now used by most home, studio and university printmakers. A wide range of textures and litho-like washes are easily produced when using the ‘Mark Resist 150 microns’ grained drawing film. This film is sold in large sheets (100 cm x 70 cm). We buy this film in packs of a hundred sheets for the University and when bought in these amounts is very reasonably priced. It is imperative that you work on the grained side of the film or textures and washes may not be accomplished. The textured side of the film is quite difficult to recognise but, by using your nail, you can just feel the ‘tooth’ on the surface of the sheet. The ‘Mark Resist’ is also thin enough to take incredibly detailed rubbings”.
‘Water-based Screen Printing and Safe Ceramic Transfer’ Dave Fortune.
Dave’s account of locating and testing Mark Resist film in 1989 is testament to his unique introduction of a commercial textured film to fine art print making and in particular serigraphy. Serigraphy can be used in this instance the application is not industrial but fine art.
Dave Fortune, Silkscreen senior technical instructor UWE describes the screen printing process with mark resist in detail.
It is extremely important that the surface of the Mark Resist is degreased before you start work: use a little methylated spirit and tissue. I find that mixing methylated spirit with the TG1 or Rotring ink gives the best washes, water can be used but when the ink is diluted too much it tends to repel on the surface of the Mark Resist. When taking rubbings the flat edge of a piece of worn graphite seems to be the most sensitive technique, revealing the finest nuances of an image.
By using a mixture of these marks you can build and layer an image ready to transfer to a screen. It is better to to use a heavier mark than too light a mark. Many printmakers like sanding or scratching into an image with a scalpel until the grain or texture required is achieved. It is possible to lay a grain of graphite or chinagraph down first then sand it away and work on top again with a draw image. Do not use Fineliners or Felt-tip pens as these marks will not hold back the light. For fine line work use a dip pen with TG1 ink or a Faber-Castell Pitt artist pen.
Screen Chemistry
The coating of a screen with a photo-sensitive emulsion is probably the most important stage of the process. If this goes wrong it will effect the exposure time and you will either lose detail or the whole image. From now on I will relate to the ‘squeegee side’ or the ‘back of the screen’, which is self explanatory.
With a fine quality coating trough that is not in any way dented or damaged, you coat the back of the screen with a single smooth layer of emulsion. ONE COAT ONLY. If you in any way mess it up, do not try to recoat a second time! Just wash off with a cold water spray, dry and start again. It is also important that you coat only a dry screen as even a wet coating trough will cause problems. You can coat in daylight but get it into a dark place as quickly as possible. Dry the screen with warm air circulating; a fan heater or hair dryer will do. BE WARNED! if you hold a hair dryer or fan heater too close it will melt the mesh which can be costly and annoying.
When coated and dry you can store the screens in a dark place or a drying cabinet for a day or so. Personally I think that it is preferable to expose the screen within hours. The fresher the better! Remember, when dry the screen is much more sensitive to ultra violet light! (daylight).
Exposing the Coated Screen
When the screen is completely dry take it from the drying cabinet and place it on top of your drawing or positive which is already in place on the glass top of the exposure unit (right reading). Be careful that the glass top of the exposure unit print-down frame is clean and not scratched in any way. Place the piece of string over the edge of the screen frame as this helps to speed up the vacuum. Clip the lid down and turn the vacuum pump on. You will see after a few moments that the latex rubber is sucked down and moulds over the screen. This is very important as it gives perfect contact between the screen coating and your image. By pulling the release catch the print-down frame can be swivelled to the vertical position.
We are now ready to expose the image to the ultra violet light source. The light should have been on for at least 15 minutes and positioned on the line on the floor. Set the timer for two and a quarter minutes (which is the average time for a drawn image on Mark Resist) or ask for advice as all images will vary in exposure times. Be sure that the light switch is on full before pressing the green button. WARNING, ULTRA VIOLET LIGHT CAN DAMAGE YOUR EYES, DO NOT LOOK DIRECTLY AT THE LIGHT AT ANY TIME! The light source has its own timer and will turn off automatically when you have left the room.
When the light source has turned itself off put the print-down frame back to its original position and turn the vacuum off. Unclip the lid and lift carefully. Remove the screen and wash out the image immediately with a cold water spray. Spray both sides of the image three times making sure that you spray the whole area of emulsion and not just the image area. Then blot both side of the screen with newsprint and place in the drying cabinet for 15 minutes.
Foot-note: Do not use cutting tools on the glass of the exposure unit. Cuts or scratches on the glass will show on half tone work. Also please keep the glass clean.
Some Information on Screen Mesh
Most screen mesh is mono-filament polyester or nylon, the average mesh count for water-based printing being 120T stretched to abut 20 newtons. For fabric printing use a 62T or 90T mesh count. A 120T mesh is 40 microns thick whereas a 90T mesh is 48 microns, a more robust mesh. When fine half tones are needed (65-105 lpi) a 150T is a favourite as there are no problems with interference patterns between the mesh and dot. Screen mesh does not seem to wear out! It usually gets broken in some way.
Degreasing
With a new screen, a dilute coating of paste (Pregan Paste) over the mesh and left for 15 minutes degreases and cleans away silicon used in the manufacture of the mesh. This is the only time that I degrease a screen. It appears that once you have completely changed to a water-based system there is no grease or oil, the power washer also helps.
Setting Up to Print and Registration Techniques
Remove your dry screen from the drying cabinet, hold it up to a window or above a light box and touch out any specks or parts of the image that you do not want to print using the green touch out filler (Safe guard). Then back into the dryer for a few minutes. Screens must be mesh up in the dryer or damage can occur. Try also to keep wet screens ie: screens that have been washed, to the bottom racks of the dryer as wet screens may drip onto newly coated screens. Take the screen out again and fix it into your screen bed with the four clamps. Do not force the clamps. If they are tight ask for advice. If you leave anything loose you will not achieve register as the screen will move. Most frustrating!
Very grateful for these insights and knowledge from : Dave Fortune, Silkscreen senior technical instructor’ worksheet: Water-based Screen Printing and Relevant Stencil Chemistry
imp.uwe.ac.uk/imp_public/downloadFile.asp?URN=3779&furn=5347&io
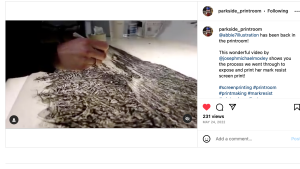
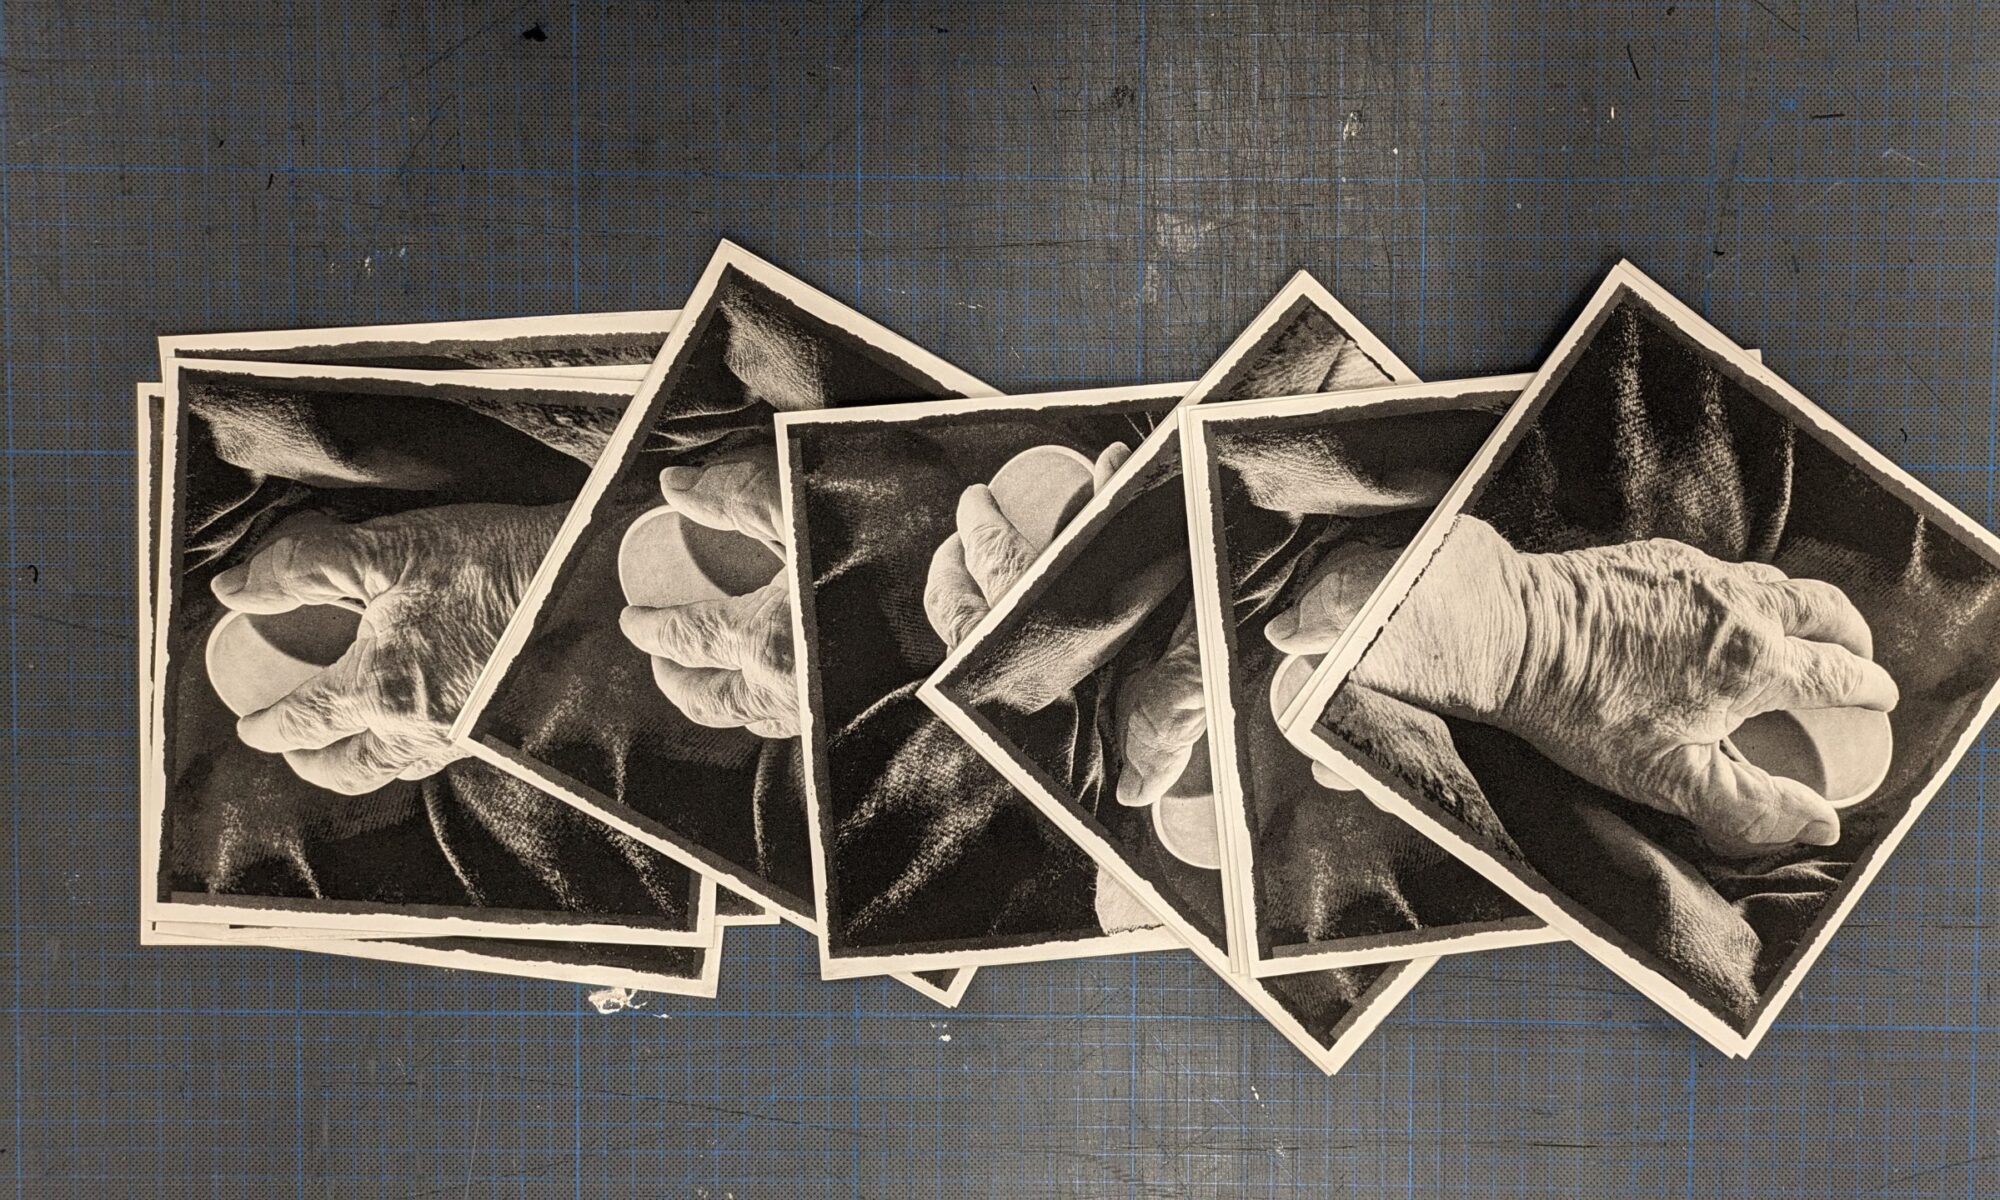
@abbie7illustration is a printmaker using mark resist to interpret her drawings through silk screen printing. Her evocative images of West Wales land and seascapes work well with the medium. She draws, paints, inks, spatters on the mark resist, exposes and prints. Her methods are expressively shown in this short film made with @ruth_designs_x here’s a link to the film
The magic of mark resist.
Mark resist is a polyester film with a texture on at least one side. This can be used to hold a mark from a pencil, crayon, wash, splatter or even scratches. It was introduced 40 years ago as an addition to methods of creating masks for a silk screen to enable tonal images to be printed through the mesh.
In the past screen printers have used a wide range of materials to create masks including paper, paint, ‘stop out’ which traditionally created swathes of flat colour suitable for posters. Film negatives were invented to enable bit mapped and half tone dot images to create photographic style images that could be held on the screen by exposing through a light sensitive emulsion to create a photostencil to be printed as the ink passed through the mesh. This enabled large scale photographic images to be created for bill boards and the like. CMYK being used to split an image into 4 colours then printed in register to recreate the colour photograph.
An insight into Silk Screen Practice by Tessa Sulston
Screen printing is basically a stencil method where ink is dragged across a mesh allowing it to print onto the paper underneath in selected areas. Any type of drawn or painted idea can be converted into a screen print and results can vary enormously from flat areas of colour to textured and sketchy linear prints. I use acrylic-based inks which can be individually mixed like paint. They can be mixed with varying degrees of transparency so that when overprinting extra colours are created. Unlike etching where the print is the reverse of the image on the plate, this is a positive method of printing with no need to reverse the image at any stage. It is therefore ideal for printing text.
To begin with the easiest and quickest method is with paper stencils. Simple torn edges look good but stencils can also be cut from greaseproof paper or waxed craft paper. For screen filler stencils you will need some water-based screen filler from a printmaking supplier. The filler will act like a paper stencil when printing but enables you to have a more painterly image. Drawing fluid is specifically designed for stencil making and is used with screen filler to produce a drawn positive image.
Once you’ve mastered these techniques try using photo stencils – where the screen is coated with photo-sensitive emulsion and a drawn or photographic image exposed onto it. On my mixed media course I encourage people to take quite contrasted photos (although Photoshop will help increase the contrast). Tones can be more clearly seen if the image is split into tiny dots or lines. Once exposed the areas of emulsion blocked from the light are washed out leaving a clear photographic tonal image.
It’s important that the paper you print on is quite absorbent – fabric is excellent. I often print directly onto canvas but have printed onto foil, wood, glass, slate – almost anything! Although traditionally ink is dragged through the screen mesh with a squeegee, I often use sponges and create grades of colours blending into one another. If you want to block an area from printing just put a piece of paper underneath to prevent the ink from going through. One of the best things about this type of printing is that you can do a long run of identical prints or equally you can do one-off prints and experiment with the medium. Often my best prints happen by accident!
© Tessa Sulston 2010 Tessa Sulston teaches at the Callington School of Art in Cornwall.
There is very little information on the application of mark resist film techniques.
Marks : The variety of marks, washes and reticulations can be created by using resists
- oil crayon
- carborundum Speedball wash
- Crisco smears
- dry brush marks
- Speedball wash
- Sharpie
- Lascaux acrylic paint
- litho crayon
- pencil, graphite
- painterly mark making
http://www.nontoxicprint.com/acrylicresistetching.htm
Reticulation/ creating the marks is an art in itself – how much graphite to build up to let what percentage of light through to the emulsion coating on the screen. And then how much light to expose through the resist and its marks. So a variety of marks were applied across a sheet of resist – paint, ink, pencil, crayon, graphite – exposed like an old style analogue dark room photography test strip with stepped exposures fro 5 tp 60 minute durations.
How to Guide – Exposing Capillex
Under exposure is the single biggest cause of stencil breakdown on the press. Follow this simple guide on how to optimise the exposure time
Once Capillex has been adhered to the mesh and dried, it is ready for exposure. The objective with exposure is to penetrate the photostencil material all the way through to the mesh to ensure hardening around the filaments and thus obtain good stencil adhesion whilst accurately reproducing the detail on the film positive.
http://autotype.macdermid.com/how-to-guides/details/8/how_to_guide_exposing_capillex
Kip Gresham print studio
http://www.theprintstudio.co.uk/services/
The Print Studio is a professional collaborative printmaking studio and publisher of artists’ original prints. Kip Gresham has been working with artists for over 40 years.
http://www.theprintstudio.co.uk/services/
The Print Studio is a professional collaborative printmaking studio and publisher of artists’ original prints. Kip Gresham has been working with artists for over 40 years.
There is very little information on the application of mark resist film techniques.
Marks : The variety of marks, washes and reticulations can be created by using resists
- oil crayon
- carborundum Speedball wash
- Crisco smears
- dry brush marks
- Speedball wash
- Sharpie
- Lascaux acrylic paint
- litho crayon
- pencil, graphite
painterly mark making
http://www.nontoxicprint.com/acrylicresistetching.htm
Reticulation/ creating the marks is an art in itself – how much graphite to build up to let what percentage of light through to the emulsion coating on the screen.
And then how much light to expose through the resist and its marks
So a variety of marks were applied across a sheet of resist – paint, ink, pencil, crayon, graphite – exposed like an old style analogue dark room photography test strip with stepped exposures fro 5 tp 60 minute durations.
How to Guide – Exposing Capillex
Under exposure is the single biggest cause of stencil breakdown on the press. Follow this simple guide on how to optimise the exposure time
Once Capillex has been adhered to the mesh and dried, it is ready for exposure. The objective with exposure is to penetrate the photostencil material all the way through to the mesh to ensure hardening around the filaments and thus obtain good stencil adhesion whilst accurately reproducing the detail on the film positive.
http://autotype.macdermid.com/how-to-guides/details/8/how_to_guide_exposing_capillex
kip Gresham print studio